Home » » Photoshop Tutorial: Teks Retro Shiny

Photoshop Tutorial: Teks Retro Shiny

Bahan-bahan

Langkah 1

Buat dokumen baru di Photoshop. Ini harus menjadi 2.100 piksel lebar dan tinggi 3300 piksel dengan resolusi 300 dpi. Menggunakan alat ember (G) Isi layer background dengan warna hitam.
step_1
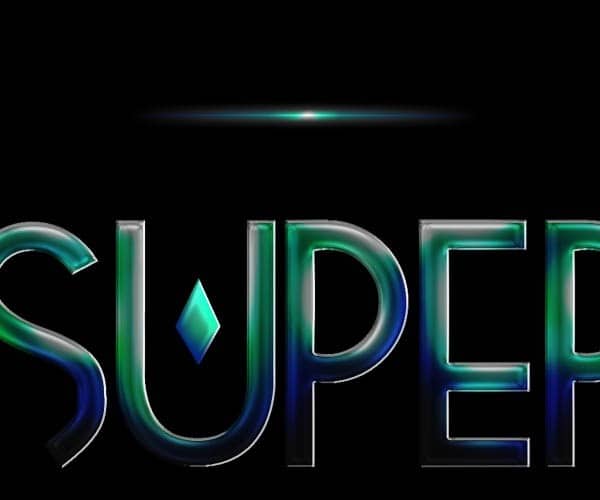
Pergi ke Alat jenis (T) dan pilih Font Tetra dengan ukuran sekitar 250 pt (Anda dapat melakukannya lebih besar jika Anda ingin) dan jenis kata "Super" pada bagian atas kanvas. Saya memilih font Tetra karena bentuk tetapi Anda dapat menggunakan font yang Anda suka.
step_1a
Klik kanan pada teks lapisan jenis dan pilih "Rasterize lapisan" untuk membuatnya dapat diedit.
step_1b
Buat layer baru. Pilih bentuk jenis (Ctrl + klik pada thumbnail layer) dan ambil alat Brush (B). Kita akan melukis di atas seleksi pada layer baru untuk mendapatkan warna untuk tipe. Pertama mulai dengan nada tengah palet warna yang ingin Anda gunakan. Dalam hal ini, untuk kata pertama saya memilih kombinasi biru gelap akan semua jalan ke hijau terang.
step_1c
Isi seleksi dengan warna biru. Pilih kekerasan sikat lembut 0% dari sekitar 250 pixel dan sikat atas bagian bawah dari jenis dengan biru gelap untuk menciptakan shading beberapa.
step_1d
step_1e
Mengubah ukuran sikat untuk sesuatu tentang 150pxl dan pilih warna hijau gelap dan mulai mengecat bagian-bagian yang lebih ringan di bagian atas huruf. Pastikan untuk meninggalkan beberapa jejak biru di bawah nada hijau. Anda juga dapat menurunkan opacity dari kuas untuk sekitar 40% untuk berbaur dalam warna lancar.
step_1f
Lanjutkan cara ini dengan nada hijau ringan. Pastikan Anda menyimpan petunjuk sedikit warna di bawah nuansa cerah dan berbaur warna dengan sikat lembut Anda.
step_1g
step_1h
Sekarang menggunakan warna putih dan sikat kecil, tambahkan menyoroti lagi ke bagian lebih ringan dari surat-surat.
step_1i
Setelah Anda confortable dengan hasilnya, Anda dapat pergi ke Image> Adjustments> Brightness dan kontras untuk membuat warna pop sedikit lebih:
step_1j
Anda seharusnya sudah memiliki sesuatu yang mirip dengan ini:
step_1k

Langkah 2

Sekarang kita akan menambahkan efek layer style beberapa jenis untuk memberikan cetak mengkilap hoki. Klik dua kali pada ibu jari lapisan untuk membuka menu Layer Styles dan Periksa "Bevel dan Emboss" pilihan. Pada pilihan Kedalaman tetap pada 100% dengan ukuran 5px. Pada Shading ini menggunakan Sudut -29 dan ketinggian suhu 37 °, mengubah kontur Gloss ke opsi menunjukkan di bawah ini:
step_2a
Sekarang Periksa "Satin" pilihan menggunakan modus Blending untuk memperbanyak dengan warna hitam untuk opacity 39%. Mengubah sudut ke -71, Jarak ke 11 dan ukuran 14. Mengubah kontur dengan bentuk pada contoh:
step_2b
Setelah menerapkan efek lapisan Anda harus memiliki sesuatu seperti ini:
step_2c
Sekarang membuat layer baru dan bergabung ke lapisan tipe (Ctrl + E) untuk menerapkan efek pada lapisan yang sama. Pada titik ini Anda dapat mengubah Kecerahan dan Kontras jenis lagi jika Anda merasa warna terlalu mendapat dicuci:
step_2d
Sekarang kita akan meningkatkan beberapa highlights menggunakan alat menghindar (O). Ambil kuas, sangat kecil lembut dan mengatur paparan 10% dan rentang "Highlights". Sikat secara lembut selama highlights terang dari tipe mengikuti kontur huruf:
step_2e

Langkah 3

Kami pada dasarnya akan melakukan proses yang sama untuk 2 kata lain. Untuk yang kedua saya bermain-main dengan font Tetra dan bagaimana kasus atas dan huruf kecil dari font memiliki dekorasi yang berbeda untuk setiap huruf.
step_3a
Untuk kata ini, saya memilih palet warna mulai dari ungu gelap ke merah muda sangat ringan.
step_3b
Jangan ragu untuk bereksperimen dengan pilihan warna dan kombinasi. Untuk menerapkan efek layer style Anda dapat menyalin layer style dari kata sebelumnya dan tempel pada lapisan kata berikutnya:
step_3c
step_3d
Jangan lupa untuk memperbaiki kecerahan dan kontras gambar serta menghindari highlights dari jenis:
step_3e
step_3f
Untuk IÂ'm kata akhir akan menggunakan kombinasi warna pergi dari cokelat sangat gelap kuning merah dan cahaya.
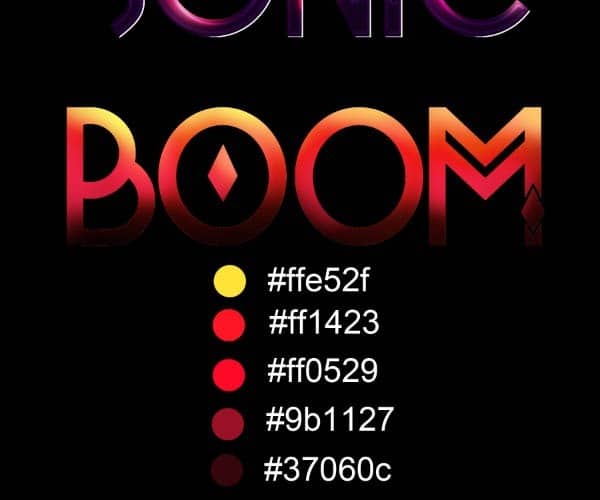
step_3g
Copy dan paste layer style dari kata lain:
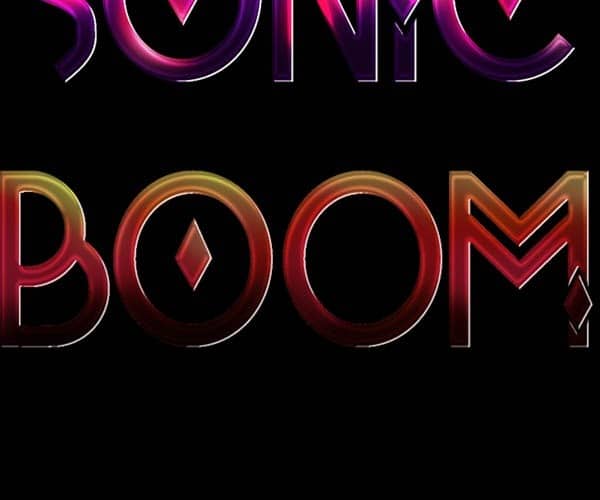
step_3h
Ingatlah untuk menghindari highlight dan menyesuaikan kecerahan dan kontras.
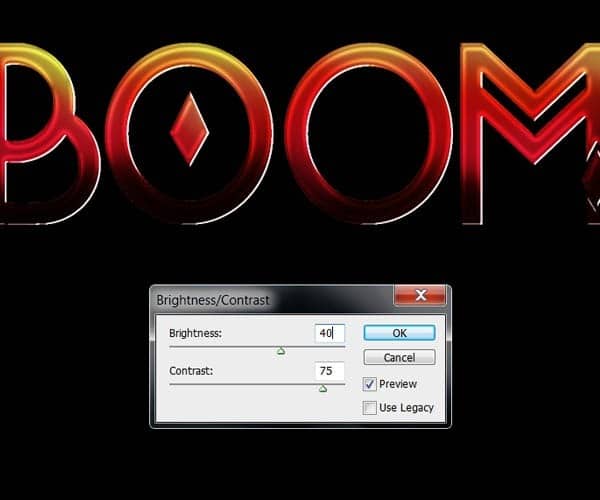
step_3i
Setelah Anda selesai mewarnai jenis Anda harus memiliki sesuatu seperti hasil di bawah ini:
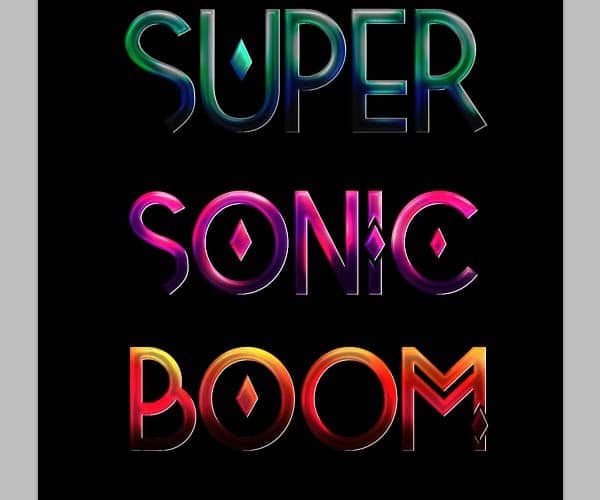
step_3j

Langkah 4

Dari langkah ini pada kita akan menambahkan elemen warna-warni untuk menghias jenis. Untuk membuat garis bercahaya, terlebih dahulu membuat layer baru, ambil alat kuas dan memilih sikat keras opacity kekerasan 100% 100% dari sekitar 4px kemudian buka sampai menu kuas dan di bawah "Dinamika Shape" pilihan, mengubah kontrol untuk " Pen Pressure ". Setelah menyesuaikan pengaturan ini, pilih pen tool (P)
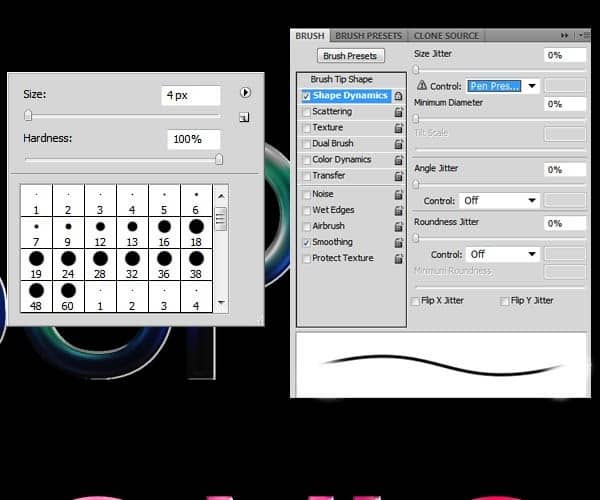
step_4a
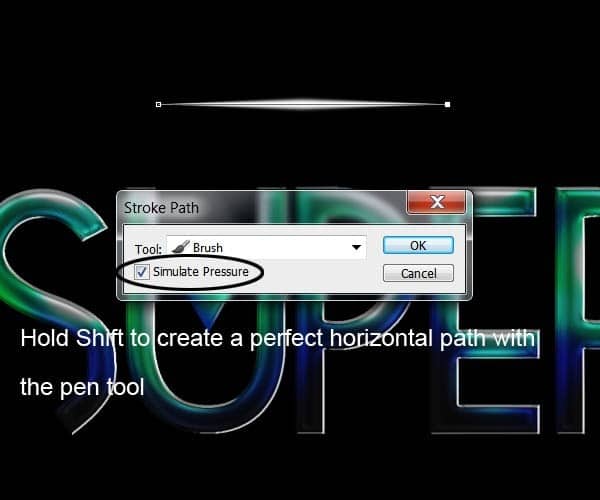
Sementara memegang "Shift" menggambar jalan untuk membuat garis horizontal. Klik kanan di jalan dan pilih opsi "Stroke Path" mengubah "alat" pilihan untuk Sikat dan memeriksa "Simulasikan tekanan" pilihan pada.
step_4b
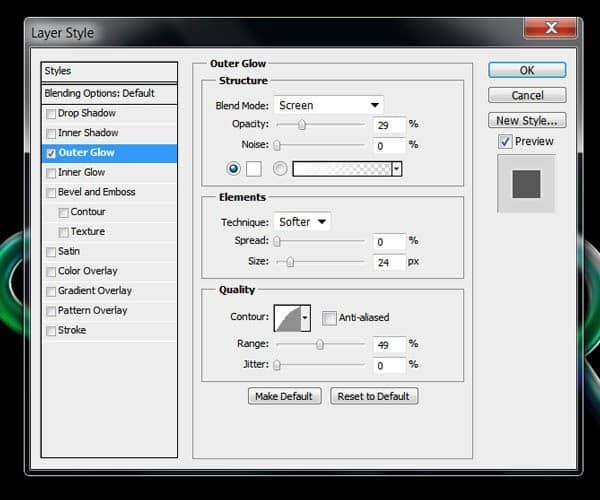
Klik dua kali pada ibu jari lapisan untuk membuka menu Layer gaya dan memeriksa opsi "Outer Glow" dan "Gradient Overlay". Di bawah pilihan cahaya luar menggunakan pengaturan yang ditunjukkan di bawah:
step_4c
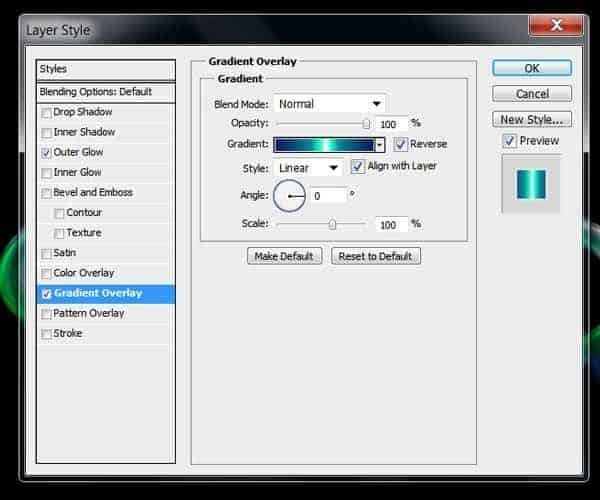
Di bawah pilihan overlay gradien cek "Reverse" dan mengatur sudut untuk 0A °
step_4d
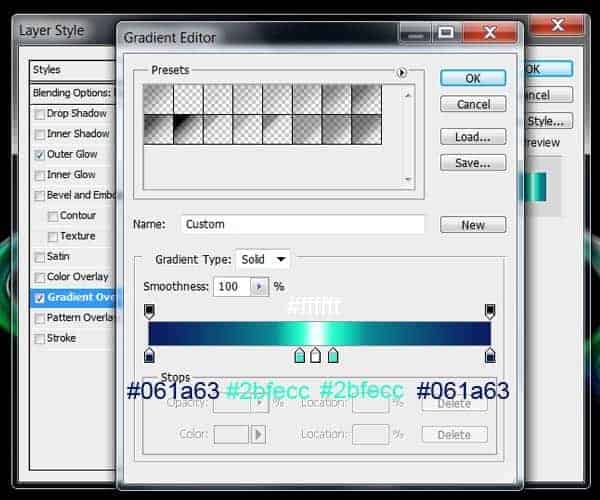
Klik dua kali pada gradien untuk membuka editor. Mengubah gradien ke warna berikutnya untuk cocok dengan tipe.
step4_e
step4_f
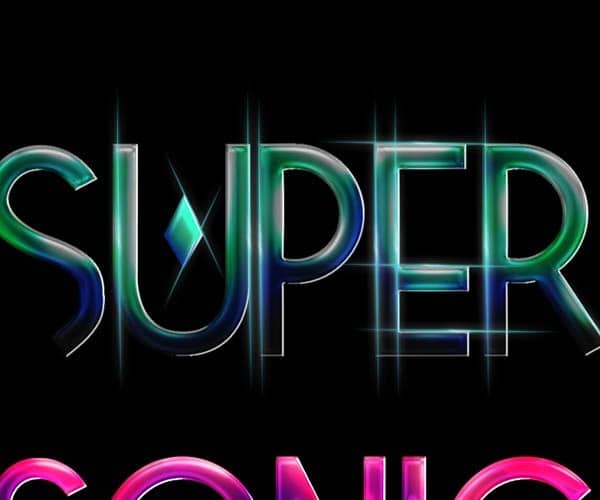
Sekarang kita akan mulai duplikasi bentuk ini dan meletakkannya di tepi setiap huruf. Putar sedikit jika diperlukan:

step4_g
step4_h
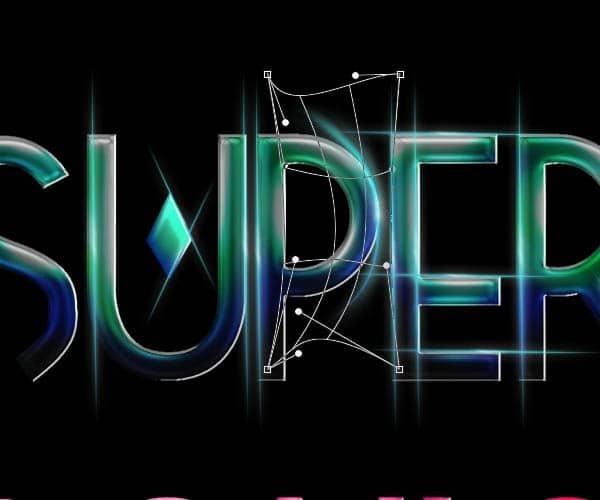
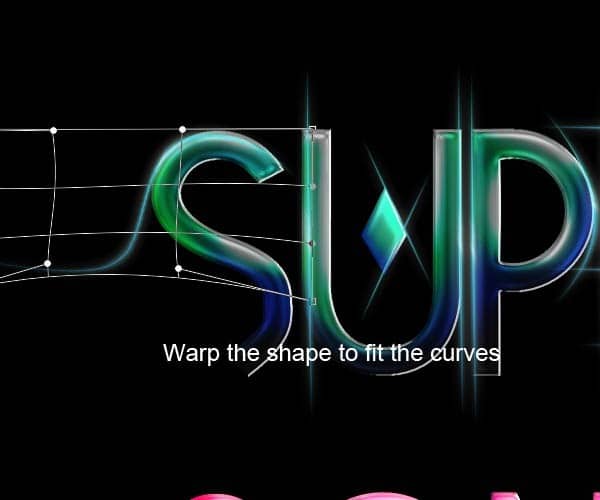
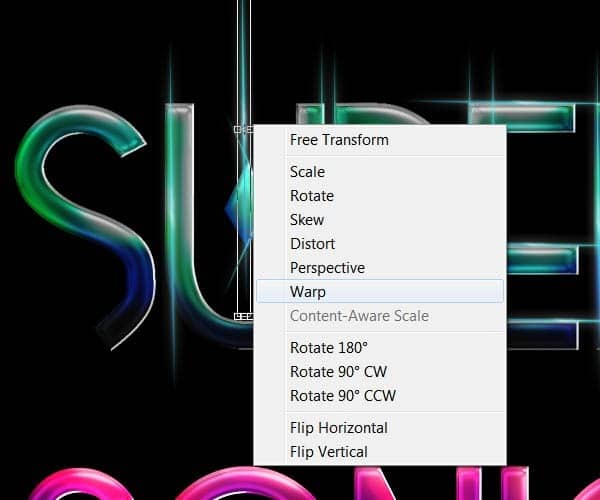
Gunakan "Warp" alat transformasi untuk kurva garis bercahaya untuk mencocokkan bagian putaran huruf:
step4_i
step4_j
step4_k
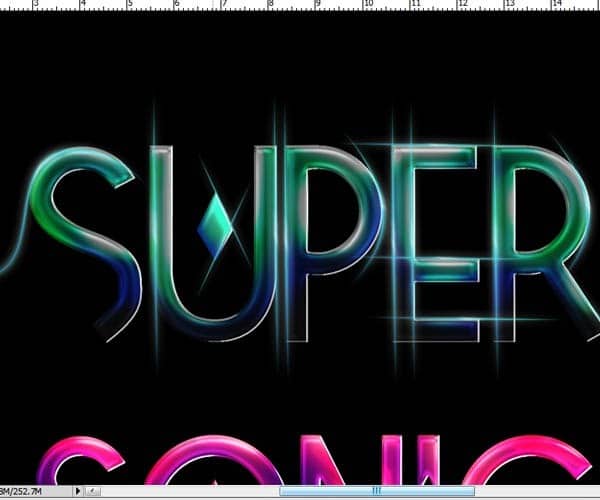
Saya sarankan untuk tidak menempatkan terlalu banyak detail karena kita akan menambahkan elemen lain untuk komposisi dan terlihat saya sedikit terlalu berat pada beberapa bagian:
step4_l
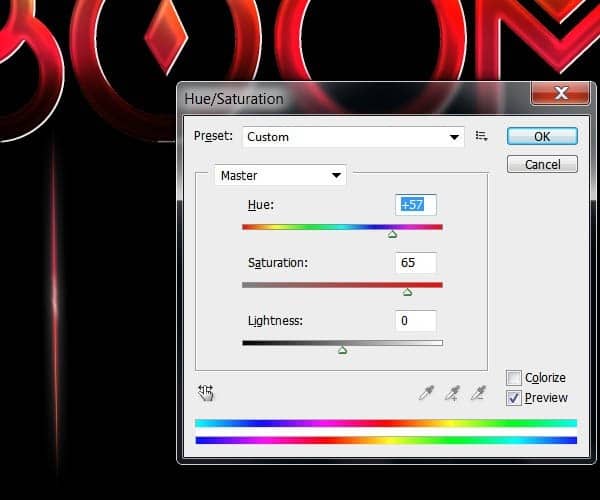
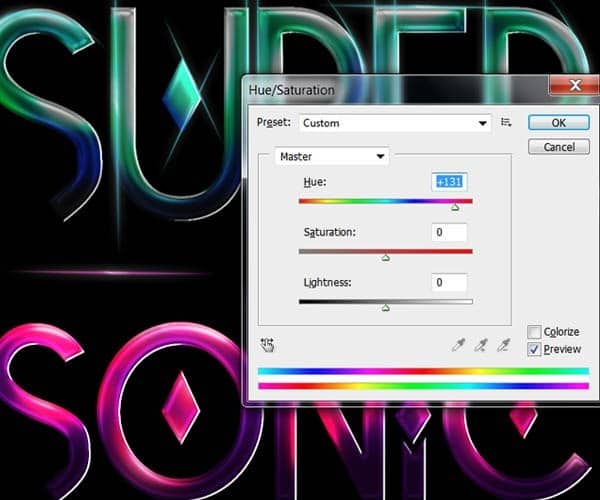
Ambil salah satu garis bercahaya dari kata pertama dan pergi ke Image> Adjustments Hue> / Saturation dan mengubah warna untuk mencocokkan kata lainnya.
step4_m
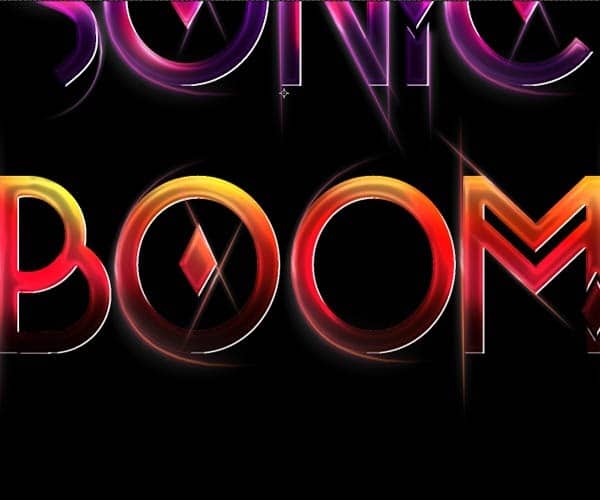
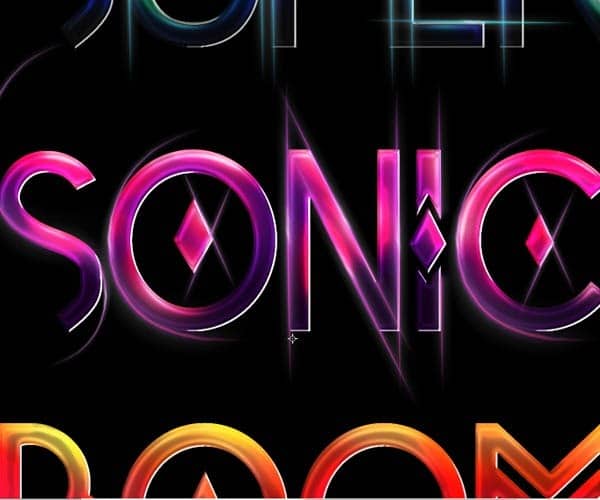
Mengatur mereka dengan cara yang sama untuk 2 kata lain.
step4_n
step4_o
step4_p
Ini adalah hasil yang kita punya sejauh ini:
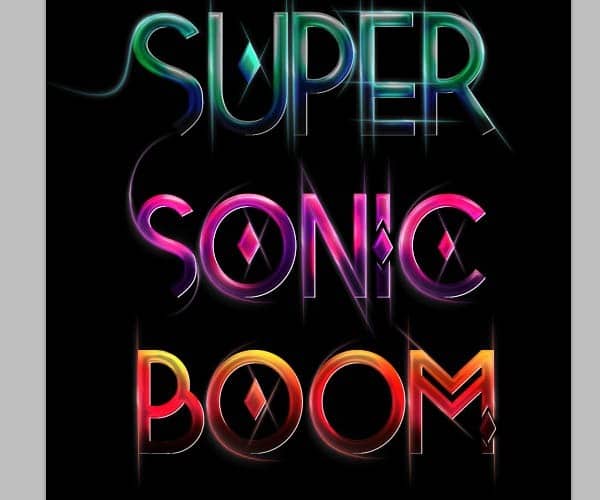
step4_q

Langkah 5

Untuk lampu berkedip di bawah huruf pertama kita perlu menduplikasi lapisan tipe berwarna dan menempatkannya di bawah lapisan tipe. Pergi ke menu Filter> Blur> Motion blur dan mengatur sudut ke 0 dan jarak ke 998.
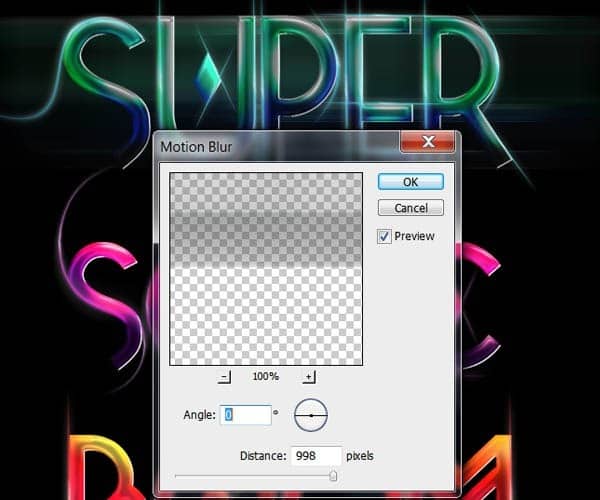
step5_a
Duplikat layer dan menggabungkan kedua lapisan kabur bersama-sama untuk mendapatkan efek yang lebih kuat.

step5_b
Ulangi langkah ini dengan 2 kata lain:

step5_c

Langkah 6

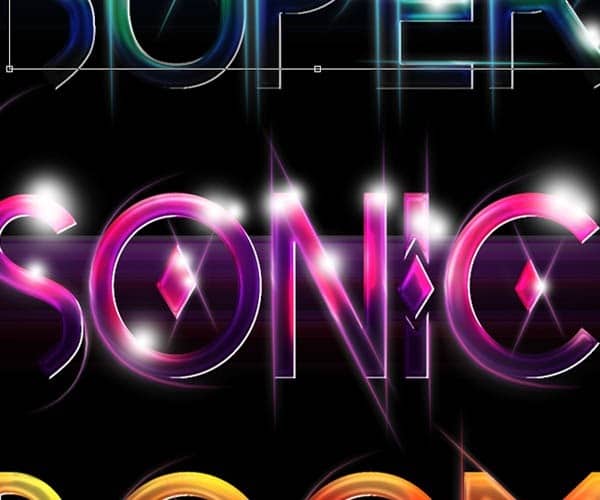
Untuk bersinar mengambil alat sikat dengan kekerasan 0% dan ukuran sekitar 120px dengan warna putih. Buat layer baru di atas lapisan jenis dan sikat bersinar sedikit di atas menyorot setiap:
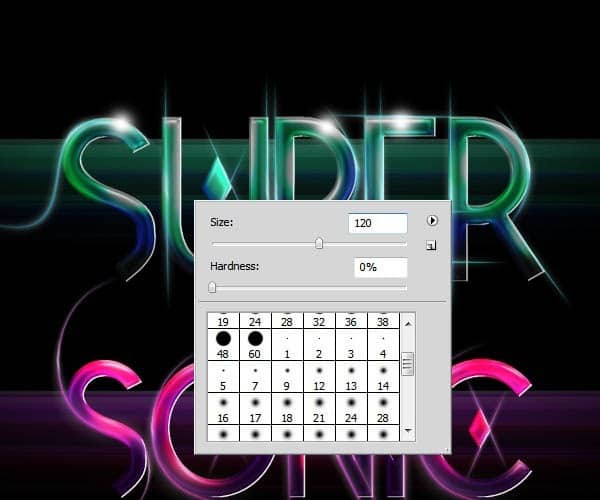
step6_a
Turunkan ukuran kuas dan menambahkan beberapa bola bercahaya lebih kecil sekitar yang lebih besar:

step6_b
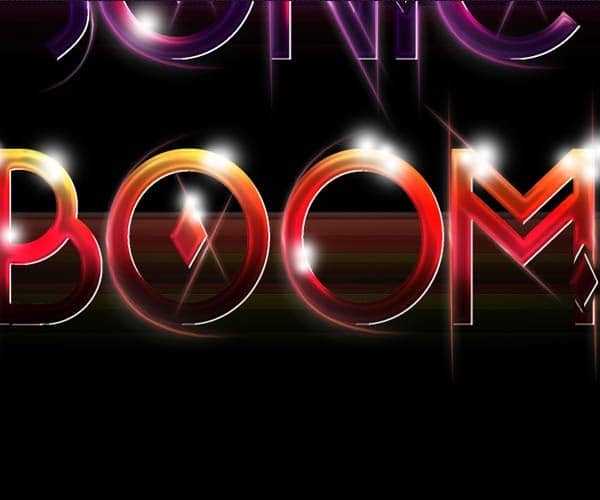
Ulangi dengan dua kata lain:
step6_c
step6_d

Langkah 7

Untuk meningkatkan bersinar kini membuat salib beberapa cahaya dengan menggunakan alat pena. Mengatur alat kuas pertama terhadap kekerasan 100% dan ukuran 4px dengan tekanan pena pilihan yang dipilih dan menggambar salib menggunakan alat pena dan membelai jalan.
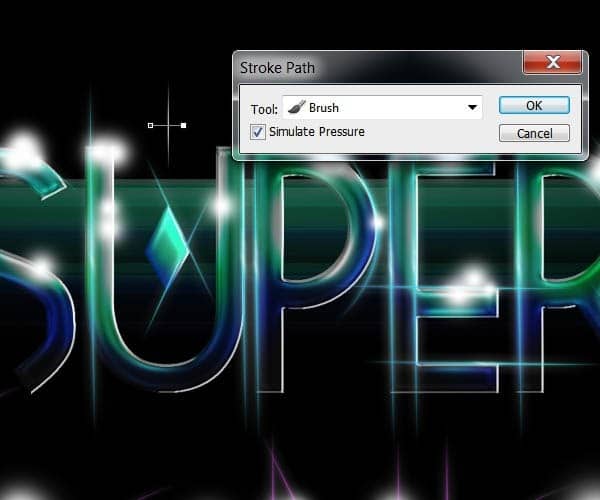
step7_a
Putar melintasi sedikit dan duplikat layer beberapa kali. Tempatkan salib kecil di atas setiap cahaya dari langkah sebelumnya.
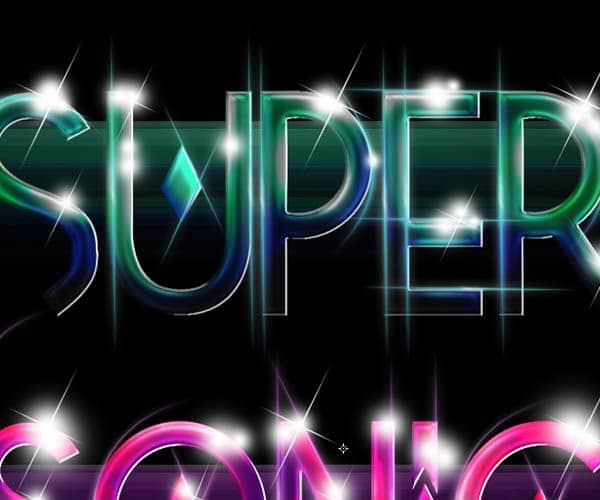
step7_b
Gambar Anda harus terlihat seperti ini setelah menduplikasi salib berkali-kali dan menempatkan mereka pada cahaya orbs:
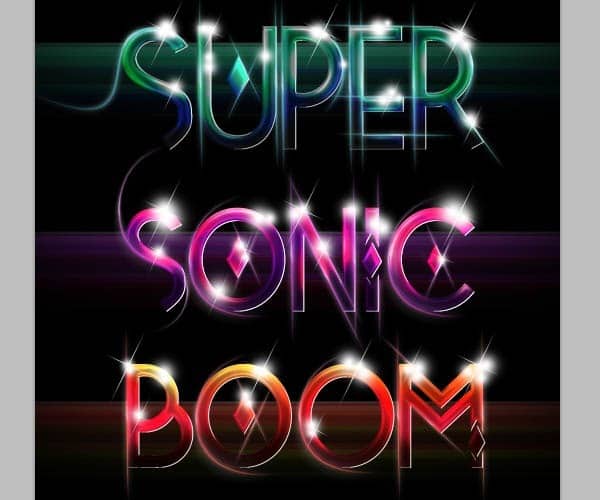
step7_c

Langkah 8

Untuk rincian gelombang bercahaya belakang jenis, pertama kali memulai membuat layer baru dan menetapkan alat sikat Anda dengan kekerasan 100% dan ukuran sekitar 9px. Whit stroke pen tool garis horizontal besar dan kemudian pergi ke Filter> Distort Gelombang>. Gunakan parameter berikutnya untuk gelombang pertama:
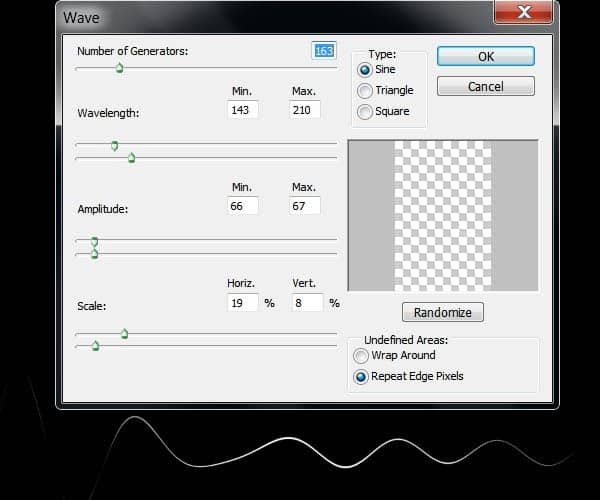
step8_a
Pada lapisan baru stroke yang beberapa garis horizontal lainnya dan pergi ke filter gelombang lagi. Saya sarankan Anda bereksperimen dengan pengaturan yang berbeda di sini untuk mendapatkan gelombang Anda melihat lebih cocok untuk komposisi Anda.
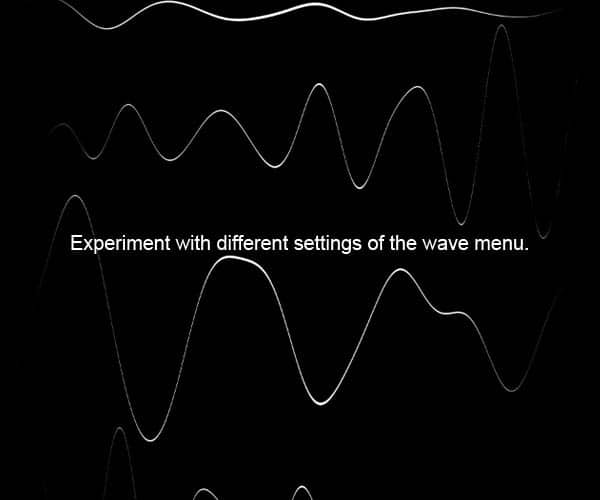
step8_b
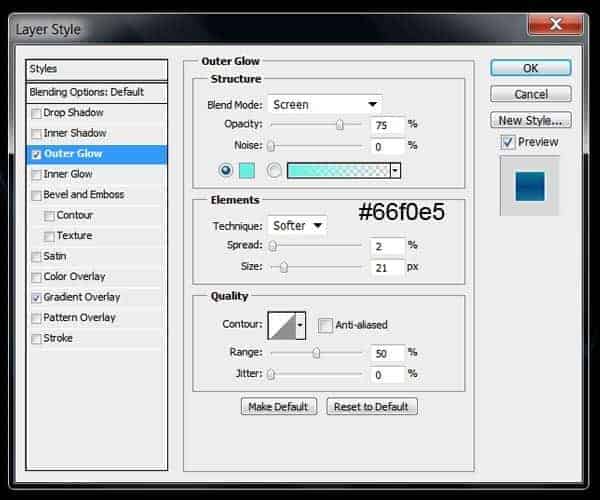
Pilih salah satu lapisan gelombang dan membuka menu lapisan gaya. Periksa opsi "Outer Glow" dan "Gradient Overlay".
step8_c
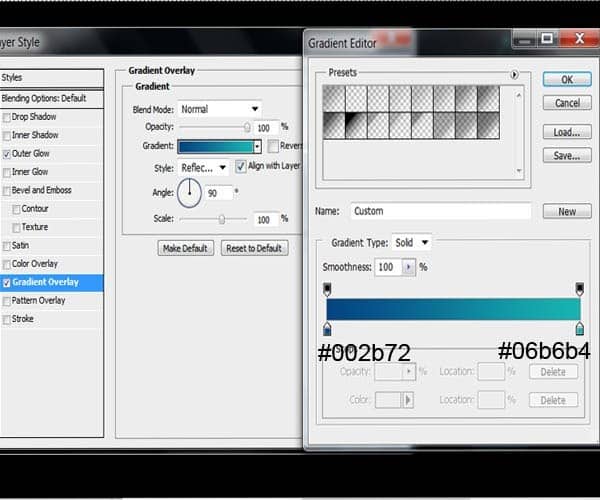
Pada pilihan overlay gradien pilih "Tercermin" gaya dan mengubah warna gradien untuk menyesuaikan palet warna jenis Anda.
step8_d
step8_e
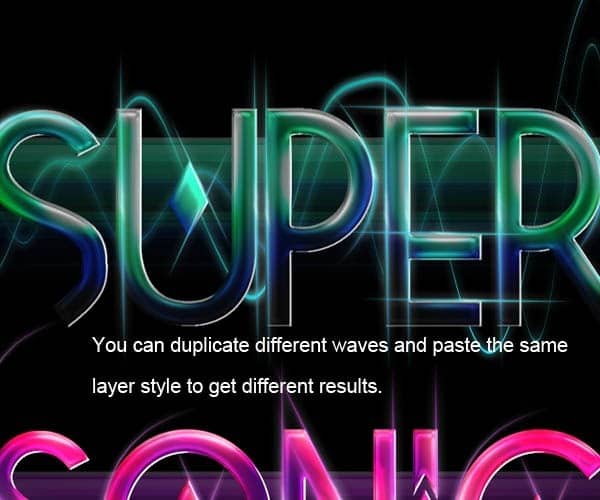
Sekarang Anda dapat menyalin gaya lapisan ke lapisan gelombang yang berbeda yang Anda buat posisi mereka di bawah jenis Anda.
step8_f
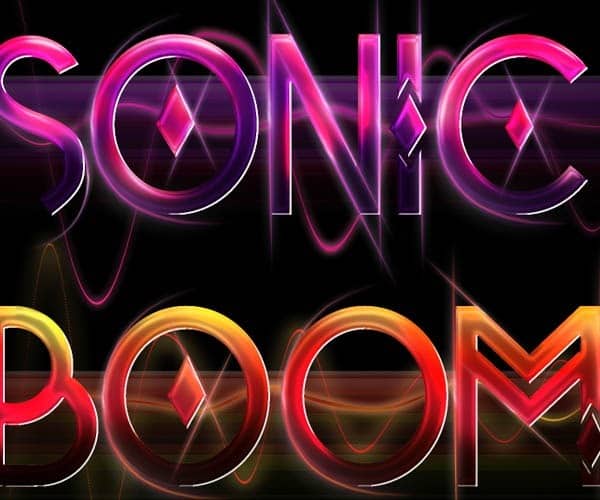
Sekarang Anda dapat menduplikasi dan membuat lapisan gelombang baru dan tweak warna cahaya dan overlay gradien untuk mencocokkan warna dari dua kata lain.
step8_g
Ini adalah hasil dari jenis sejauh ini:
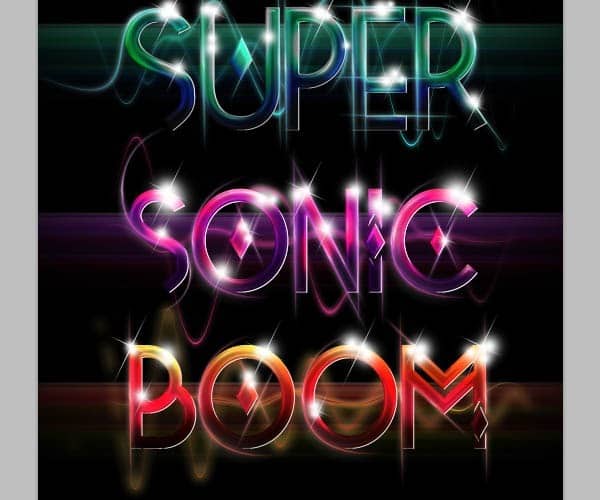
step8_h
Akhirnya pada langkah ini, untuk latar belakang bertitik kita akan menggunakan lagi metode yang sama seperti dengan gelombang tetapi dengan parameter filter yang berbeda untuk mendapatkan efek.
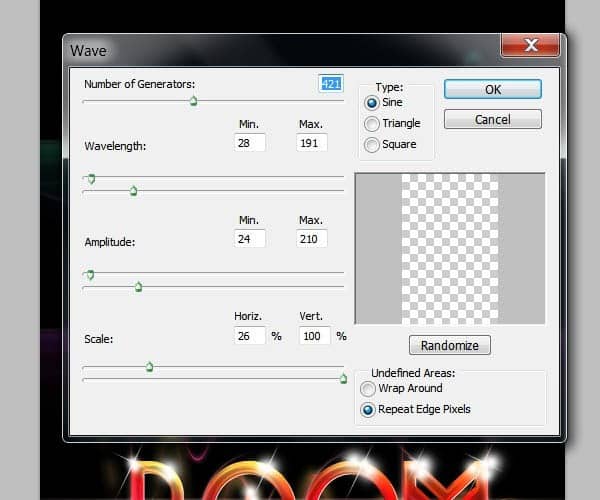
step8_i
Transform lapisan agar sesuai dengan seluruh kanvas:
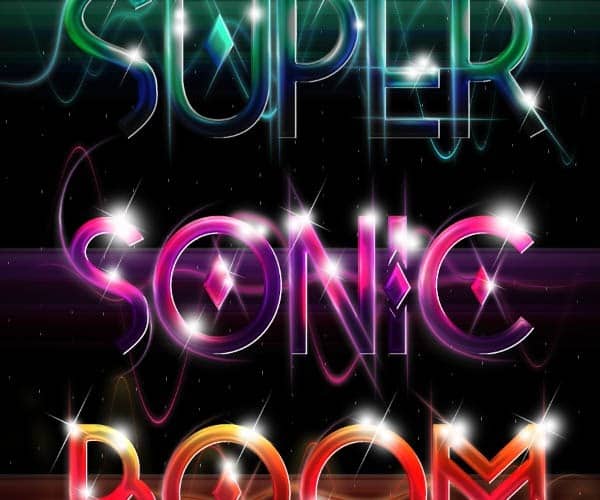
step8_j

Langkah 9

Dalam langkah ini kita akan menambahkan beberapa gambar saham bokeh untuk menyelesaikan komposisi dan efek dari jenis. Dari Sparklestock gambar bokeh pilih salah satu yang Anda lihat cocok untuk ilustrasi Anda. Mengatur modus lapisan blending "Layar" dan menurunkan opacity layer menjadi 30%:
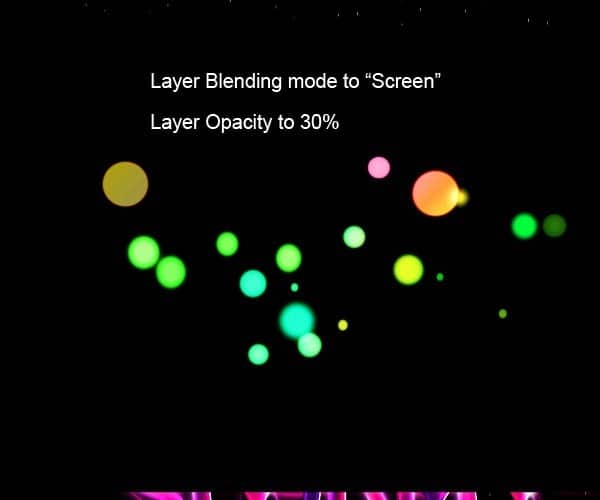
step9_a
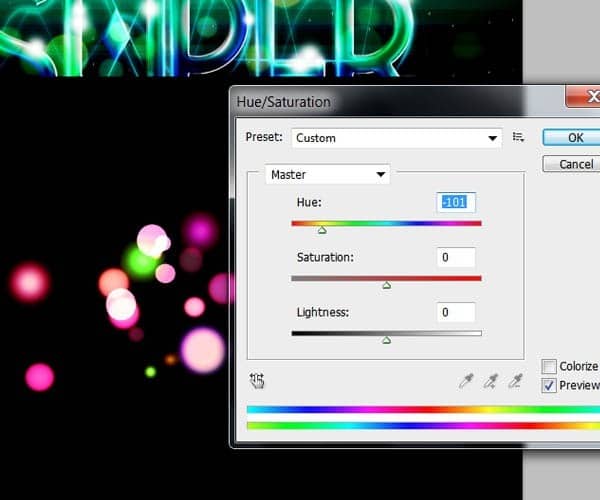
Sekarang saya menggunakan kombinasi gambar saham yang berbeda untuk menyelesaikan efek. Anda dapat memilih apa pun yang Anda inginkan gambar bokeh. Jika Anda adalah kuas hanya sampel warna dari jenis yang Anda menerapkan efek. Jika Anda menggunakan gambar bokeh datar, berubah warna dengan pilihan pengaturan Hue / Saturation.
step9_b
step9_c
step9_d
Terus menambahkan lapisan yang berbeda dan mengubah warna mereka untuk mendapatkan hasil yang lebih baik.

Langkah 10

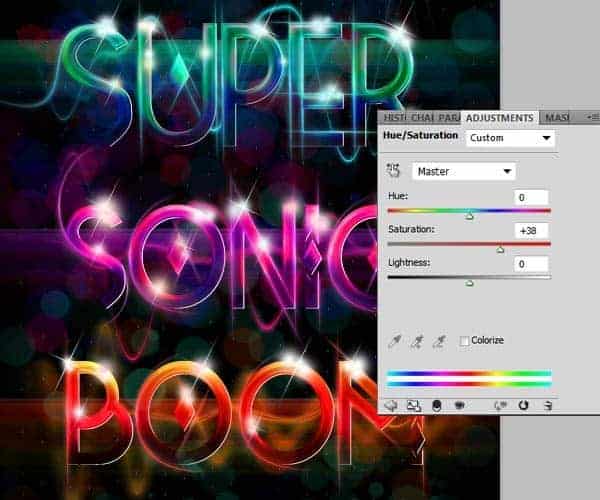
Untuk langkah terakhir kita akan membuat beberapa lapisan Penyesuaian untuk meningkatkan tampilan komposisi. Pergi ke menu Layer> New Adjustment layer> Hue / Saturation dan meningkatkan Saturasi untuk membuat warna terlihat lebih hidup.
step10_a

Step 1

Create a new document on Photoshop. It should be 2100 pixels wide and 3300 pixels high with a resolution of 300 dpi. Using the bucket tool (G) Fill the background layer with black.
step_1
Go to the type Tool (T) and select the Tetra Font with a size of about 250 pt (you can do it larger if you want) and type the word “Super”on the upper part of the canvas. I chose the Tetra font because of its shapes but you can use any font you like.
step_1a
Right click on the layer text of the type and select “Rasterize layer” to make it editable.
step_1b
Create a new layer. Select the type shape (Ctrl+click on the layer thumbnail) and grab the Brush tool (B). We are going to paint over the selection on the new layer to get the colors for the type. First start with the middle tone of the color palette you want to use. In this case, for the first word I chose a combination of dark blues going all the way to bright greens.
step_1c
Fill the selection with the blue color. Select a soft brush 0% hardness of about 250 pixels and brush over the lower part of the type with the darker blue to create some shading.
step_1d
step_1e
Change the size of the brush to something about 150pxl and select the darkest green color and start painting the lighter parts on the top of the letters. Be sure to leave some traces of the blue underneath the greener tones. You can also lower the opacity of the brush to about 40% to blend in the colors smoothly.
step_1f
Continue this way with the lighter green tones. Make sure you keep little hints of the color under the brighter shades and blend in the colors with your soft brush.
step_1g
step_1h
Now using color white and a smaller brush, add some more highlights to the lighter part of the letters.
step_1i
Once you are confortable with the result, you can go to Image>Adjustments>Brightness and contrast to make the colors pop a bit more:
step_1j
You should now have something similar to this:
step_1k

Step 2

Now we are going to add some layer style effects to the type to give it a shinny glossy finish. Double click on the layer thumb to bring up the Layer Styles menu and Check the “Bevel and Emboss” option. On the Depth option keep it at 100% with a size of 5px. On the Shading use an Angle of -29 and an altitude of 37°, change the Gloss contour to the option showed below:
step_2a
Now Check the “Satin” option use the Blending mode to multiply with color black to 39% opacity. Change the angle to -71 , Distance to 11 and size 14. Change the contour to the shape on the example:
step_2b
After applying the layer effects you should have something like this:
step_2c
Now create a new layer and merge it to the type layer (Ctrl+E) to apply the effects in the same layer. At this point you can change the Brightness and Contrast of the type again if you feel the colors got too washed out:
step_2d
Now we are going to enhance some of the highlights using the dodge tool (O). Take a very small ,soft brush and set exposure to 10% and the range to “Highlights”. Brush gently over the brightest highlights of the type following the contour of the letter:
step_2e

Step 3

We are basically going to do the same process for the other 2 words. For the second one I played around with the Tetra font and how the upper case and lower case of the font has different decorations for each letter.
step_3a
For this word, I chose a color palette ranging from a dark purple to a very light pink.
step_3b
Feel free to experiment with your color choices and combinations. To apply the layer style effect you can copy the layer style from the previous word and paste it on the next word layer:
step_3c
step_3d
Don´t forget to fix the Brightness and contrast of the image as well as dodging the highlights of the type:
step_3e
step_3f
For the final word I´m going to use a combination of colors going from a very dark brown to red and light yellows.
step_3g
Copy and paste the layer style of the other words:
step_3h
Remember to dodge the highlights and adjust the Brightness and contrast.
step_3i
After you are done coloring type you should have something like the result below:
step_3j

Step 4

From this step on we are going to add colorful elements to decorate the type. To create the glowing lines, first create a new layer, take the brush tool and select a hard brush 100% hardness 100% opacity of about 4px then open up the brushes menu and under the “Shape Dynamics” option , change the control to “Pen Pressure”. After adjusting this settings, select the pen tool (P)
step_4a
While holding the key “Shift” draw a path to create a horizontal line. Right click on the path and select the option “Stroke Path” change the “tool” option to Brush and check the “Simulate pressure” option on.
step_4b
Double click on the layer thumb to bring up the Layer styles menu and check the options “Outer Glow” and “Gradient Overlay”. Under the outer glow option use the settings shown below:
step_4c
Under the gradient overlay option check “Reverse” and set the angle to 0°
step_4d
Double click on the gradient to bring up the editor. Change the gradient to the next colors to match those of the type.
step4_e
step4_f
Now we are going to start duplicating this shape and placing it on the edges of each letter. Rotate it a bit where necessary:
step4_g
step4_h
Use the “Warp” transformation tool to curve the glowing line to match the round parts of the letters:
step4_i
step4_j
step4_k
I recommend not to put too much detail because we are going to add other elements to the composition and it my look a bit too heavy on some parts:
step4_l
Grab one of the glowing lines from the first word and go to Image>Adjustments>Hue/Saturation and change the color to match the other word.
step4_m
Arrange them the same way for the other 2 words.
step4_n
step4_o
step4_p
This is the result we´ve got so far:
step4_q

Step 5

For the light flashes under the letters first we need to duplicate the layer of the colored type and place it under the type layer. Go to menu Filter>Blur>Motion blur and set the angle to 0 and the distance to 998.
step5_a
Duplicate the layer and merge both blurred layers together to get a stronger effect.
step5_b
Repeat this step with the other 2 words:
step5_c

Step 6

For the shines take the brush tool with 0% hardness and a size of about 120px with color white. Create a new layer on top of the type layers and brush little glows on top of every highlight:
step6_a
Lower the size of the brush and add some smaller glowing orbs around the bigger ones:
step6_b
Repeat with the other two words:
step6_c
step6_d

Step 7

To enhance the glows now create some light crosses using the pen tool. Set the brush tool first to 100% hardness and a size of 4px with the pen pressure option selected and draw a cross using the pen tool and stroking the paths.
step7_a
Rotate the crosses a little bit and duplicate the layer several times. Place the little crosses on top of every glow from the previous step.
step7_b
Your image should look something like this after duplicating the crosses many times and placing them on the glow orbs:
step7_c

Step 8

For the glowing waves details behind the type,first start off creating a new layer and setting your brush tool with 100% hardness and a size of about 9px. Whit the pen tool stroke a large horizontal line and then go to Filter>Distort>Wave. Use the next parameters for the first wave:
step8_a
On new layers stroke some other horizontal lines and go to the wave filter again. I suggest you experiment with different settings here to get the waves you see more fit for your composition.
step8_b
Select one wave layer and open the layer styles menu. Check the options “Outer Glow” and “Gradient Overlay”.
step8_c
On the gradient overlay option select the “Reflected” style and change the colors of the gradient to match the color palette of your type.
step8_d
step8_e
You can now copy the layer style into a different wave layer you created an position them under your type.
step8_f
Now you can duplicate and create new wave layers and tweak the color of the glow and the gradient overlay to match the colors of the other two words.
step8_g
This is the result of the type so far:
step8_h
Finally in this step, for the dotted background we are going to use again the same method as with the waves but with different filter parameters to get the effect.
step8_i
Transform the layer to fit the entire canvas:
step8_j

Step 9

In this step we are going to add some bokeh stock images to finish up the composition and effects of the type. From the Sparklestock bokeh images select one you see fit for your illustration. Set the layer blending mode to “Screen” and lower the layer opacity to 30%:
step9_a
Now I use a combination of different stock images to complete the effect. You can choose whatever bokeh images you want. If you are brushes just sample the color of the type you are applying the effect to. If you are using flat bokeh images, change the hue with the Hue/ Saturation adjustment option.
step9_b
step9_c
step9_d
Keep adding different layers and changing their colors to get a better result.

Step 10

For the final step we are going to create some Adjustment layers to enhance the look of the composition. Go to menu Layer>New Adjustment layer>Hue/Saturation and increase the Saturation to make the colors look more alive.
step10_a
Under that Adjustment layer, now create a “Brightness and Contrast” adjustment layer and use the setting above:
step10_b
Finally under that layer create a “Levels” Adjustment layer to bring the whole composition together.
step10_c

Final Results

final_results[1]

Download PSD
Teks Retro Shiny.zip | 16,4 MB

0 komentar: